Python 图像处理:红点与数字识别
在计算机视觉领域,图像处理和识别技术扮演着至关重要的角色。无论是自动化生产线上的物体检测,还是智能交通系统中的车牌识别,都离不开图像处理技术的支持。本文将介绍如何使用 Python 和 OpenCV 库来识别图像中的红点,并提取红点旁边的数字信息。
1. 准备工作
在开始之前,我们需要安装以下软件和库:
- Python: 一种流行的编程语言,用于编写图像处理脚本。
- OpenCV: 一个强大的计算机视觉库,提供了丰富的图像处理和识别功能。
- Tesseract OCR: 一个开源的 OCR 引擎,用于识别图像中的文字。
- pytesseract: 一个 Python 库,用于与 Tesseract OCR 引擎交互。
安装教程
-
Python: 访问 Python 官网(https://www.python.org/)下载并安装最新版本的 Python。
-
OpenCV: 在命令行或终端中输入以下命令安装 OpenCV:
pip install opencv-python -
Tesseract OCR: 访问 Tesseract OCR 官网(https://tesseract-ocr.github.io/)下载并安装适合您操作系统的版本。安装完成后,将 Tesseract OCR 的安装路径添加到系统环境变量中。
-
pytesseract: 在命令行或终端中输入以下命令安装 pytesseract:
pip install pytesseract -
需要的图片
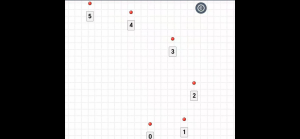
2. 红点检测
首先,我们需要编写一个函数来检测图像中的红点。以下是一个示例函数:
def get_red_points(image_path):
    """
    获取图片中红色点位的坐标

    Args:
        image_path (str): 图片路径

    Returns:
        list: 红色点位的坐标列表,每个坐标为 (x, y) 格式的元组
    """

    img = cv2.imread(image_path)

    # 检查图片是否成功读取
    if img is None:
        print(f"Error: Could not open or read image file: {image_path}")
        return []

    # 将图像从 BGR 颜色空间转换为 RGB 颜色空间
    grid_RGB = cv2.cvtColor(img, cv2.COLOR_BGR2RGB)

    # 将图像从 RGB 颜色空间转换为 HSV 颜色空间
    grid_HSV = cv2.cvtColor(grid_RGB, cv2.COLOR_RGB2HSV)

    # 定义红色 HSV 范围
    lower1 = np.array([0, 43, 46])
    upper1 = np.array([10, 255, 255])
    mask1 = cv2.inRange(grid_HSV, lower1, upper1)  # mask1 为二值图像
    res1 = cv2.bitwise_and(grid_RGB, grid_RGB, mask=mask1)

    lower2 = np.array([156, 43, 46])
    upper2 = np.array([180, 255, 255])
    mask2 = cv2.inRange(grid_HSV, lower2, upper2)
    res2 = cv2.bitwise_and(grid_RGB, grid_RGB, mask=mask2)

    # 将两个二值图像结果相加
    mask3 = mask1 + mask2

    # 形态学处理,去除噪声
    kernel = np.ones((3, 3), np.uint8)
    mask3 = cv2.morphologyEx(mask3, cv2.MORPH_OPEN, kernel)
    mask3 = cv2.morphologyEx(mask3, cv2.MORPH_CLOSE, kernel)

    # 查找轮廓
    contours, _ = cv2.findContours(mask3, cv2.RETR_EXTERNAL, cv2.CHAIN_APPROX_SIMPLE)

    # 初始化红色点位列表
    red_points = []

    # 遍历轮廓
    for contour in contours:
        # 计算轮廓的中心坐标
        M = cv2.moments(contour)
        if M["m00"] != 0:
            cX = int(M["m10"] / M["m00"])
            cY = int(M["m01"] / M["m00"])
            red_points.append((cX, cY))

    # 结果显示 (调试用,可以注释掉)
    # cv2.imshow("mask3", mask3)
    # cv2.imshow("img", img)
    # cv2.imshow("Mask1", mask1)
    # cv2.imshow("res1", res1)
    # cv2.imshow("Mask2", mask2)
    # cv2.imshow("res2", res2)
    # cv2.imshow("grid_RGB", grid_RGB[:, :, ::-1])  # imshow() 函数传入的变量也要为 bgr 通道顺序
    # cv2.waitKey(0)
    # cv2.destroyAllWindows()

    return red_points
该函数首先将图像从 BGR 颜色空间转换为 HSV 颜色空间,然后根据红色在 HSV 空间中的范围创建掩膜。接着,使用形态学操作去除噪声,并查找红色区域的轮廓。最后,计算轮廓的中心坐标并返回。
3. 数字识别
接下来,我们需要编写一个函数来识别红点旁边的数字。以下是一个示例函数:
def recognize_numbers(image, points):
    """识别红点旁边的数字编号"""
    numbered_points = []
    for (x, y) in points:
        # 截取红点右侧区域进行识别 (可以根据实际情况调整)
        roi = image[y + 50:y + 250, x - 30:x + 50]  # 调整 ROI 截取位置

        # 检查 ROI 是否为空
        if roi.size == 0:
            continue

        # 预处理图像
        gray = cv2.cvtColor(roi, cv2.COLOR_BGR2GRAY)

        # 尝试不同的阈值化方法
        _, thresh = cv2.threshold(gray, 0, 255, cv2.THRESH_BINARY_INV + cv2.THRESH_OTSU)
        # thresh = cv2.adaptiveThreshold(gray, 255, cv2.ADAPTIVE_THRESH_GAUSSIAN_C, cv2.THRESH_BINARY_INV, 11, 2)

        # 形态学处理,去除噪声 (可以根据实际情况调整)
        kernel = np.ones((2, 2), np.uint8)
        thresh = cv2.morphologyEx(thresh, cv2.MORPH_OPEN, kernel)

        # OCR 识别
        text = pytesseract.image_to_string(thresh, config='--psm 7 --oem 3 -c tessedit_char_whitelist=0123456789')  # 尝试不同的 PSM 值
        text = text.strip()

        if text.isdigit():
            numbered_points.append((int(text), x, y))

        # 显示 ROI 和阈值化后的图像 (调试用,可以注释掉)
        # cv2.imshow("ROI", roi)
        # cv2.imshow("Thresh", thresh)
        # cv2.waitKey(0)
        # cv2.destroyAllWindows()

    return numbered_points
该函数首先截取红点右侧的区域作为 ROI,然后将 ROI 转换为灰度图像并进行阈值化处理。接着,使用形态学操作去除噪声,并使用 pytesseract 库调用 Tesseract OCR 引擎识别数字。最后,将识别到的数字和红点坐标存储在列表中并返回。
4. 主程序
在主程序中,我们首先加载图像,然后调用 detect_red_points 函数检测红点,接着调用 recognize_numbers 函数识别数字。最后,我们可以对识别结果进行处理,例如排序、筛选等。
image = cv2.imread('your_image.jpg')  # 替换为您的图片路径

red_points = detect_red_points(image)
numbered_points = recognize_numbers(image, red_points)

# 打印识别结果
for num, x, y in numbered_points:
    print(f"编号: {num}, 坐标: ({x}, {y})")
6. 完整的代码:
import cv2
import numpy as np
import pytesseract
from matplotlib import pyplot as plt
# 配置Tesseract路径(根据实际安装位置修改)
pytesseract.pytesseract.tesseract_cmd = r'/opt/homebrew/Cellar/tesseract/5.5.0/bin/tesseract'
def detect_red_points(image):
"""检测图像中 RGB 值为 #F03D27 的红色点并返回中心坐标"""
# RGB 颜色值
target_red_rgb = np.array([0xF0, 0x3D, 0x27], dtype=np.uint8)
hsv = cv2.cvtColor(image, cv2.COLOR_BGR2HSV)
# 定义红色HSV范围 (根据实际情况调整)
lower_red1 = np.array([0, 100, 100])
upper_red1 = np.array([10, 255, 255])
lower_red2 = np.array([160, 100, 100])
upper_red2 = np.array([180, 255, 255])
# 创建掩膜
mask1 = cv2.inRange(hsv, lower_red1, upper_red1)
mask2 = cv2.inRange(hsv, lower_red2, upper_red2)
mask = cv2.bitwise_or(mask1, mask2)
# 可视化 Mask
# cv2.imshow("Mask", mask)
# cv2.waitKey(0)
# cv2.destroyAllWindows()
# 形态学处理 (可以根据实际情况调整)
kernel = np.ones((3, 3), np.uint8)
mask = cv2.morphologyEx(mask, cv2.MORPH_OPEN, kernel)
mask = cv2.morphologyEx(mask, cv2.MORPH_CLOSE, kernel)
# 查找轮廓
contours, _ = cv2.findContours(mask, cv2.RETR_EXTERNAL, cv2.CHAIN_APPROX_SIMPLE)
points = []
for cnt in contours:
M = cv2.moments(cnt)
if M['m00'] == 0:
continue
cx = int(M['m10'] / M['m00'])
cy = int(M['m01'] / M['m00'])
# 获取红色区域的平均颜色
x, y, w, h = cv2.boundingRect(cnt)
roi = image[y:y + h, x:x + w]
avg_color_bgr = np.mean(roi, axis=(0, 1))
avg_color_rgb = [avg_color_bgr[2], avg_color_bgr[1], avg_color_bgr[0]]
# 比较颜色差异 (可以根据实际情况调整阈值)
color_diff = np.sum(np.abs(np.array(avg_color_rgb) - target_red_rgb))
if color_diff < 50: # 阈值可以调整
points.append((cx, cy))
# 可视化 ROI
for x, y in points:
roi = image[y - 10:y + 10, x - 10:x + 10] # 调整 ROI 大小
cv2.imshow("ROI", roi)
cv2.waitKey(0)
cv2.destroyAllWindows()
return points
def recognize_numbers(image, points):
"""识别红点旁边的数字编号"""
numbered_points = []
for (x, y) in points:
# 截取红点右侧区域进行识别 (可以根据实际情况调整)
roi = image[y + 50:y + 250, x - 30:x + 50] # 调整 ROI 截取位置
# 检查 ROI 是否为空
if roi.size == 0:
continue
# 预处理图像
gray = cv2.cvtColor(roi, cv2.COLOR_BGR2GRAY)
# 尝试不同的阈值化方法
_, thresh = cv2.threshold(gray, 0, 255, cv2.THRESH_BINARY_INV + cv2.THRESH_OTSU)
# thresh = cv2.adaptiveThreshold(gray, 255, cv2.ADAPTIVE_THRESH_GAUSSIAN_C, cv2.THRESH_BINARY_INV, 11, 2)
# 形态学处理,去除噪声 (可以根据实际情况调整)
kernel = np.ones((2, 2), np.uint8)
thresh = cv2.morphologyEx(thresh, cv2.MORPH_OPEN, kernel)
# OCR 识别
text = pytesseract.image_to_string(thresh, config='--psm 7 --oem 3 -c tessedit_char_whitelist=0123456789') # 尝试不同的 PSM 值
text = text.strip()
if text.isdigit():
numbered_points.append((int(text), x, y))
# 显示 ROI 和阈值化后的图像 (调试用,可以注释掉)
# cv2.imshow("ROI", roi)
# cv2.imshow("Thresh", thresh)
# cv2.waitKey(0)
# cv2.destroyAllWindows()
return numbered_points
def compute_curvature(p1, p2, p3):
"""计算三点确定的曲率半径"""
# 转换为浮点数计算
x1, y1 = p1
x2, y2 = p2
x3, y3 = p3
# 计算三角形面积
area = 0.5 * abs((x2 - x1) * (y3 - y1) - (x3 - x1) * (y2 - y1))
if area < 1e-6:
return float('inf')
# 计算边长
a = np.linalg.norm([x3 - x2, y3 - y2])
b = np.linalg.norm([x1 - x3, y1 - y3])
c = np.linalg.norm([x2 - x1, y2 - y1])
# 使用公式计算曲率半径
radius = (a * b * c) / (4 * area)
return radius
def get_red_points(image_path):
"""
获取图片中红色点位的坐标
Args:
image_path (str): 图片路径
Returns:
list: 红色点位的坐标列表,每个坐标为 (x, y) 格式的元组
"""
img = cv2.imread(image_path)
# 检查图片是否成功读取
if img is None:
print(f"Error: Could not open or read image file: {image_path}")
return []
# 将图像从 BGR 颜色空间转换为 RGB 颜色空间
grid_RGB = cv2.cvtColor(img, cv2.COLOR_BGR2RGB)
# 将图像从 RGB 颜色空间转换为 HSV 颜色空间
grid_HSV = cv2.cvtColor(grid_RGB, cv2.COLOR_RGB2HSV)
# 定义红色 HSV 范围
lower1 = np.array([0, 43, 46])
upper1 = np.array([10, 255, 255])
mask1 = cv2.inRange(grid_HSV, lower1, upper1) # mask1 为二值图像
res1 = cv2.bitwise_and(grid_RGB, grid_RGB, mask=mask1)
lower2 = np.array([156, 43, 46])
upper2 = np.array([180, 255, 255])
mask2 = cv2.inRange(grid_HSV, lower2, upper2)
res2 = cv2.bitwise_and(grid_RGB, grid_RGB, mask=mask2)
# 将两个二值图像结果相加
mask3 = mask1 + mask2
# 形态学处理,去除噪声
kernel = np.ones((3, 3), np.uint8)
mask3 = cv2.morphologyEx(mask3, cv2.MORPH_OPEN, kernel)
mask3 = cv2.morphologyEx(mask3, cv2.MORPH_CLOSE, kernel)
# 查找轮廓
contours, _ = cv2.findContours(mask3, cv2.RETR_EXTERNAL, cv2.CHAIN_APPROX_SIMPLE)
# 初始化红色点位列表
red_points = []
# 遍历轮廓
for contour in contours:
# 计算轮廓的中心坐标
M = cv2.moments(contour)
if M["m00"] != 0:
cX = int(M["m10"] / M["m00"])
cY = int(M["m01"] / M["m00"])
red_points.append((cX, cY))
# 结果显示 (调试用,可以注释掉)
# cv2.imshow("mask3", mask3)
# cv2.imshow("img", img)
# cv2.imshow("Mask1", mask1)
# cv2.imshow("res1", res1)
# cv2.imshow("Mask2", mask2)
# cv2.imshow("res2", res2)
# cv2.imshow("grid_RGB", grid_RGB[:, :, ::-1]) # imshow() 函数传入的变量也要为 bgr 通道顺序
# cv2.waitKey(0)
# cv2.destroyAllWindows()
return red_points
# 主程序
image = cv2.imread('img.png') # 替换为你的图片路径
# 步骤1:检测红点
points = get_red_points('img.png')
# 步骤2:识别编号
numbered_points = recognize_numbers(image, points)
# 步骤3:建立坐标系
origin = next((p for p in numbered_points if p[0] == 1), None)
if not origin:
raise ValueError("未找到编号为1的点")
# 转换为相对坐标(Y轴向上)
origin_x, origin_y = origin[1], origin[2]
sorted_points = []
for p in numbered_points:
if p[0] < 1:
continue
dx = p[1] - origin_x
dy = origin_y - p[2] # 转换为笛卡尔坐标系
sorted_points.append((p[0], dx, dy))
# 按编号排序
sorted_points = sorted(sorted_points, key=lambda x: x[0])
# 步骤4:计算曲率半径
min_radius = float('inf')
min_index = 0
coordinates = [(p[1], p[2]) for p in sorted_points]
for i in range(1, len(coordinates) - 1):
radius = compute_curvature(coordinates[i - 1], coordinates[i], coordinates[i + 1])
if radius < min_radius:
min_radius = radius
min_index = i
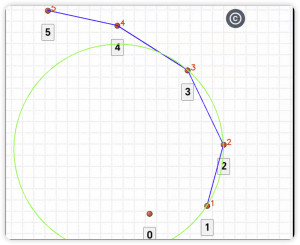
# 步骤5:绘制结果
# 转换回图像坐标系
abs_coordinates = [(origin_x + p[1], origin_y - p[2]) for p in sorted_points]
# 绘制所有点和编号
for idx, (x, y) in enumerate(abs_coordinates):
cv2.circle(image, (x, y), 5, (0, 0, 255), -1)
cv2.putText(image, str(sorted_points[idx][0]), (x + 10, y),
cv2.FONT_HERSHEY_SIMPLEX, 0.8, (0, 0, 255), 2)
# 绘制连线
for i in range(len(abs_coordinates) - 1):
cv2.line(image, abs_coordinates[i], abs_coordinates[i + 1], (255, 0, 0), 2)
# 绘制最小曲率圆
if min_radius != float('inf'):
p1 = abs_coordinates[min_index - 1]
p2 = abs_coordinates[min_index]
p3 = abs_coordinates[min_index + 1]
# 计算圆心
x1, y1 = p1
x2, y2 = p2
x3, y3 = p3
A = x2 - x1
B = y2 - y1
C = x3 - x1
D = y3 - y1
E = A * (x1 + x2) + B * (y1 + y2)
F = C * (x1 + x3) + D * (y1 + y3)
G = 2 * (A * (y3 - y2) - B * (x3 - x2))
if G == 0:
cx = cy = 0
else:
cx = (D * E - B * F) / G
cy = (A * F - C * E) / G
radius = np.sqrt((cx - x1) ** 2 + (cy - y1) ** 2)
cv2.circle(image, (int(cx), int(cy)), int(radius), (0, 255, 0), 2)
# 显示结果
cv2.imshow('Result', image)
cv2.waitKey(0)
cv2.destroyAllWindows()
# 输出结果
print("坐标列表(编号从小到大):")
for p in sorted_points:
print(f"编号 {p[0]}: ({p[1]}, {p[2]})")
print(f"n最小曲率半径:{min_radius:.2f}")
6. 总结
本文介绍了如何使用 Python 和 OpenCV 识别图像中的红点并提取红点旁边的数字信息。通过调整 HSV 范围、形态学操作和 OCR 参数,可以提高识别的准确率。希望本文能够帮助您入门图像处理和识别技术。


文章评论